Create or edit community events to help keep you organized with your event management.
To create a new event:
- In the "Add-ons" section of the navigation panel, click on "Events".
- Click on the "Create new event" button in the upper right corner.
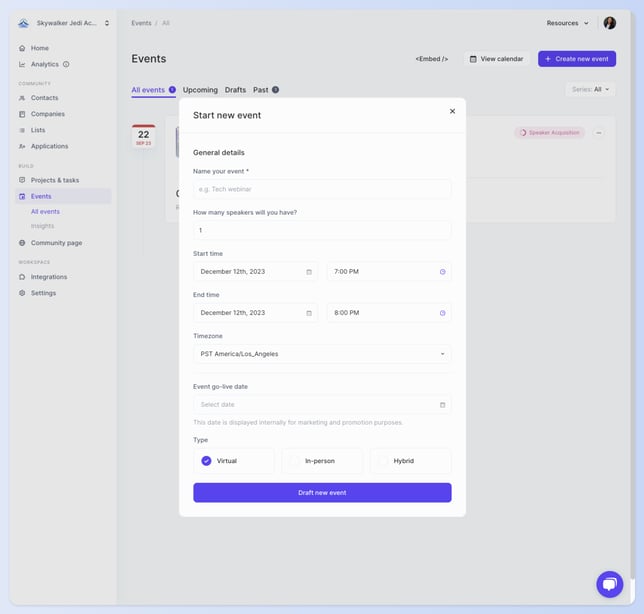
- There will be a pop-up where you can fill in basic event information. You can update this information at any time:
- Event name
- How many speakers you will have for the event
- The starting and ending date and time
- The event publish date (when the event will be announced or made public)
- The type of event - virtual, in-person, or hybrid (note: the type of event will determine certain fields on the event planning page).
- Click the "Draft new event" button.
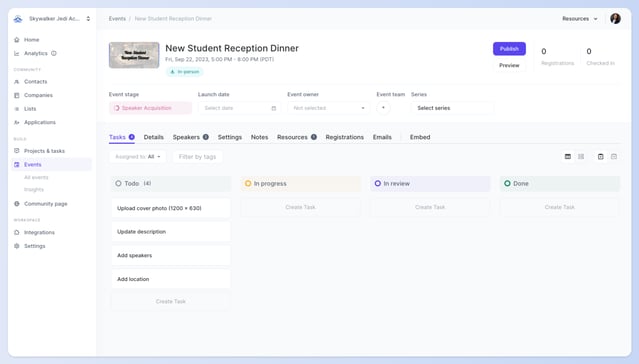
- You'll be directed to your event page where there are a number of details and items that you can customize.
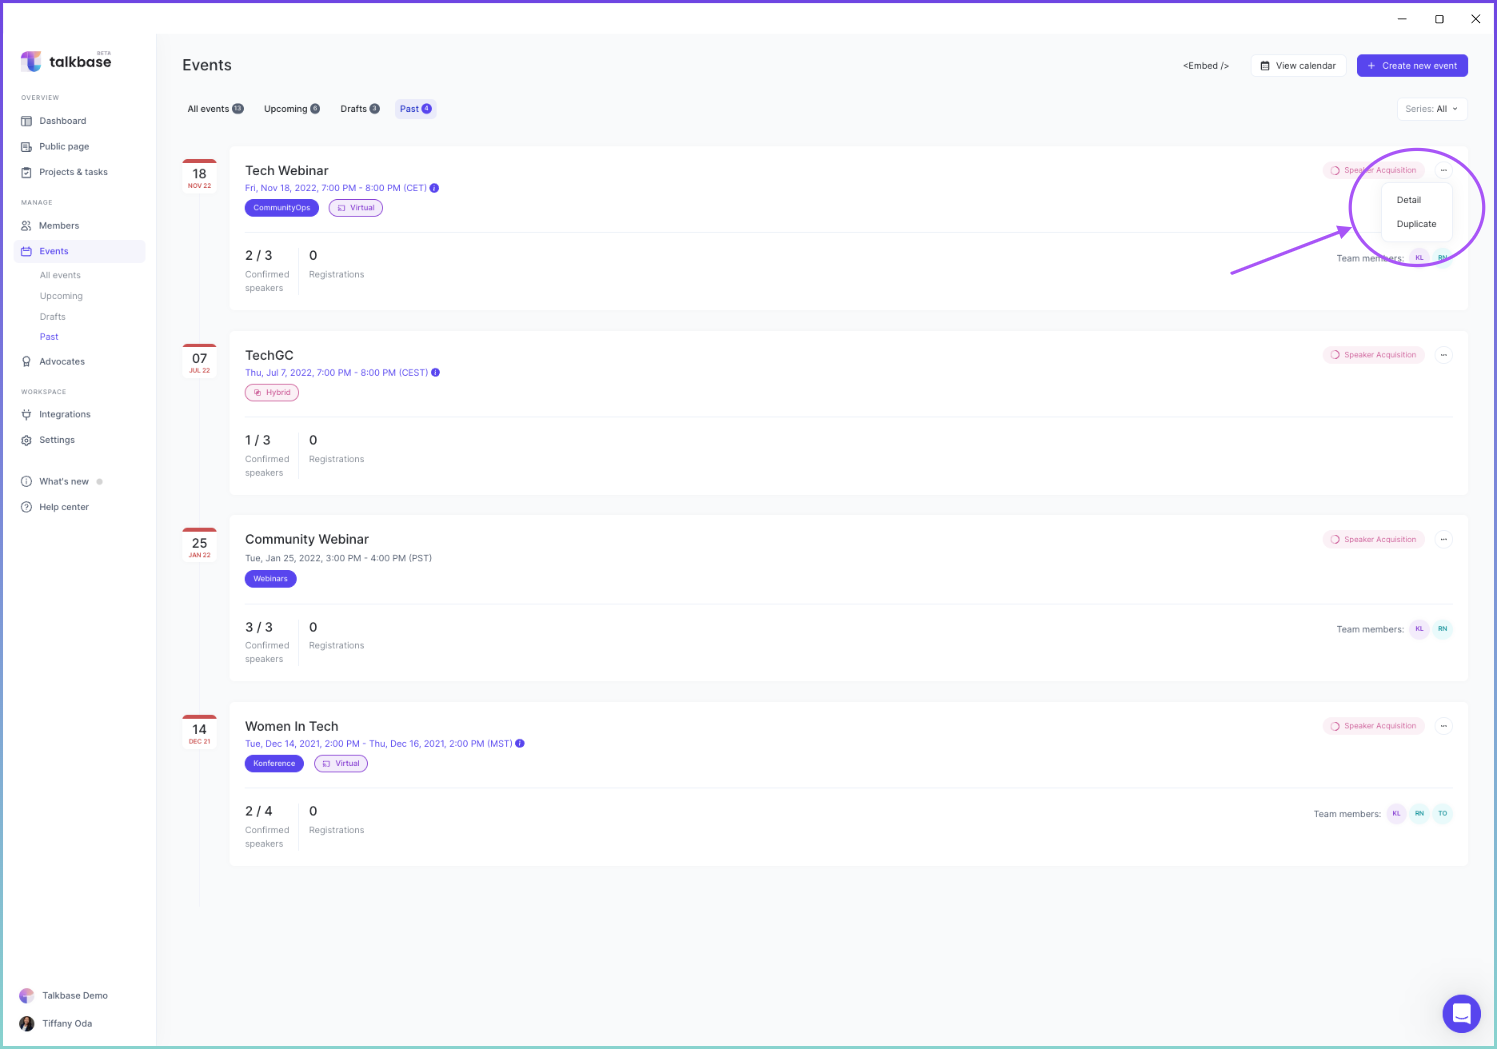
- You can also Duplicate an event by clicking on the triple dot "···" symbol in the list and selecting "Duplicate".
To edit or set up an event:
There are a number of items that you can do to plan and edit your event.
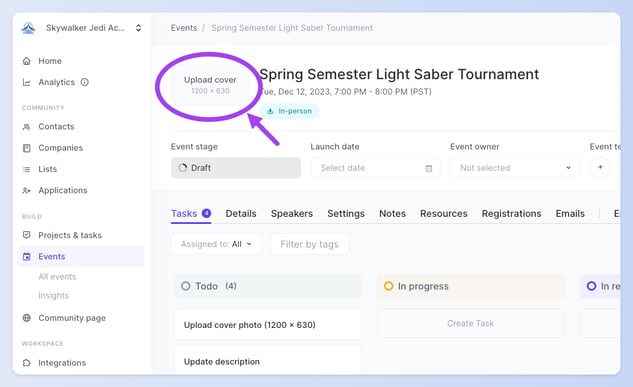
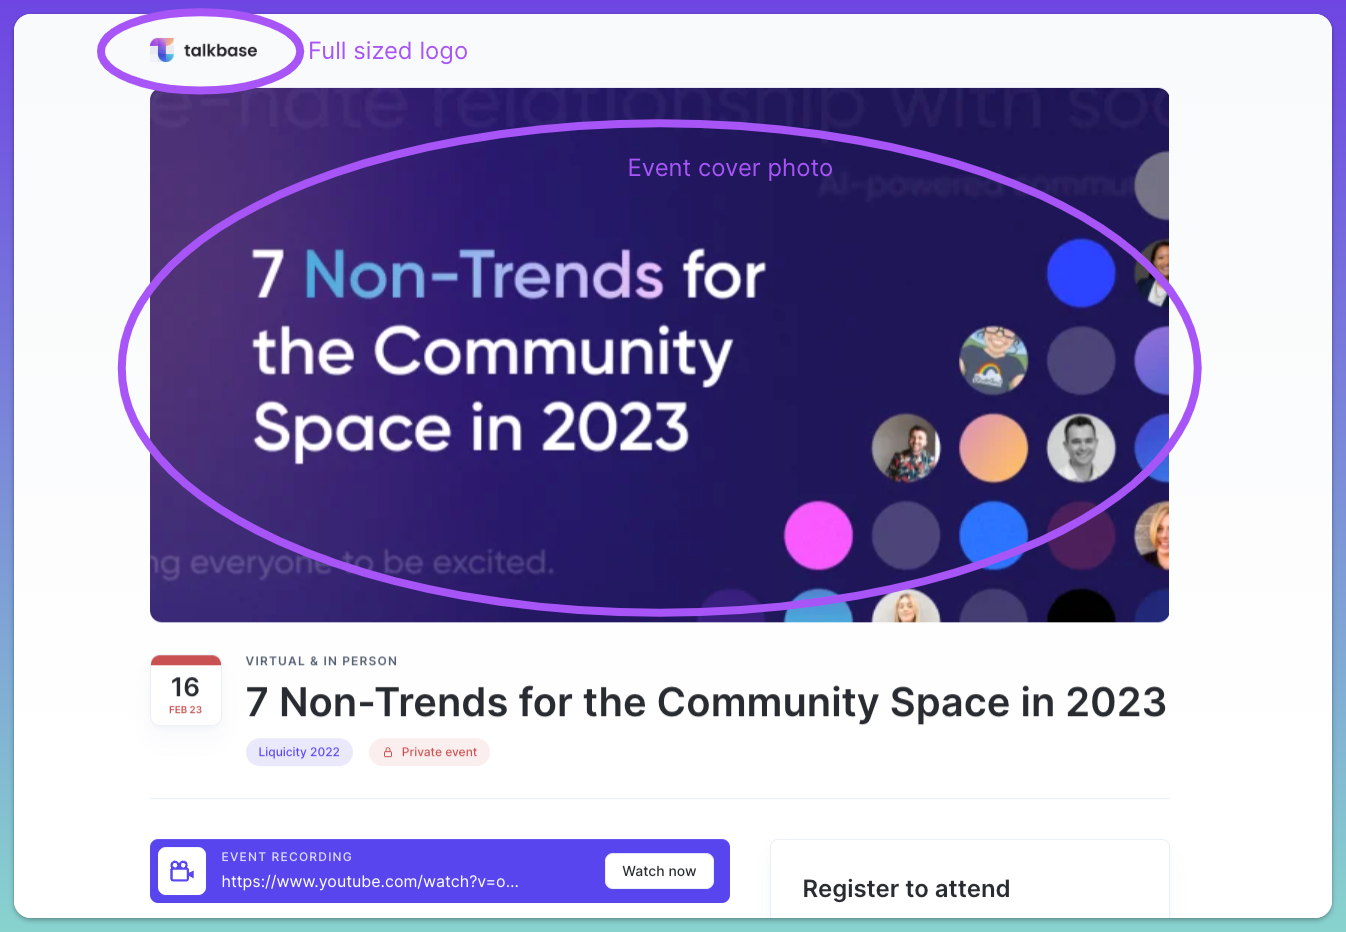
Upload a cover photo
Provide a cover photo for your event - this can be a photo of your speaker(s), a title with the event name, or whatever image you'd like to use. This image will be displayed in the event list within Talkbase and if you embed the event on your website.
- Click on "Upload cover" in the upper left corner by the event name. This will open your finder where you can select the image that you'd like to use. The best image size for the cover photo is 1200 x 630 pixels. We also recommend using a .jpeg image format.
Tip! If you go to your workspace settings and add a Full sized logo, your event's public page will not only have the cover photo but will have your logo displayed as well.
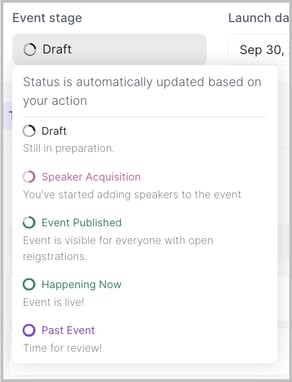
Event stage
The event stage provides the status of the event planning process. To update the event stage, click on the box with the stage of the event. The description of each stage is provided below and directly within Talkbase.
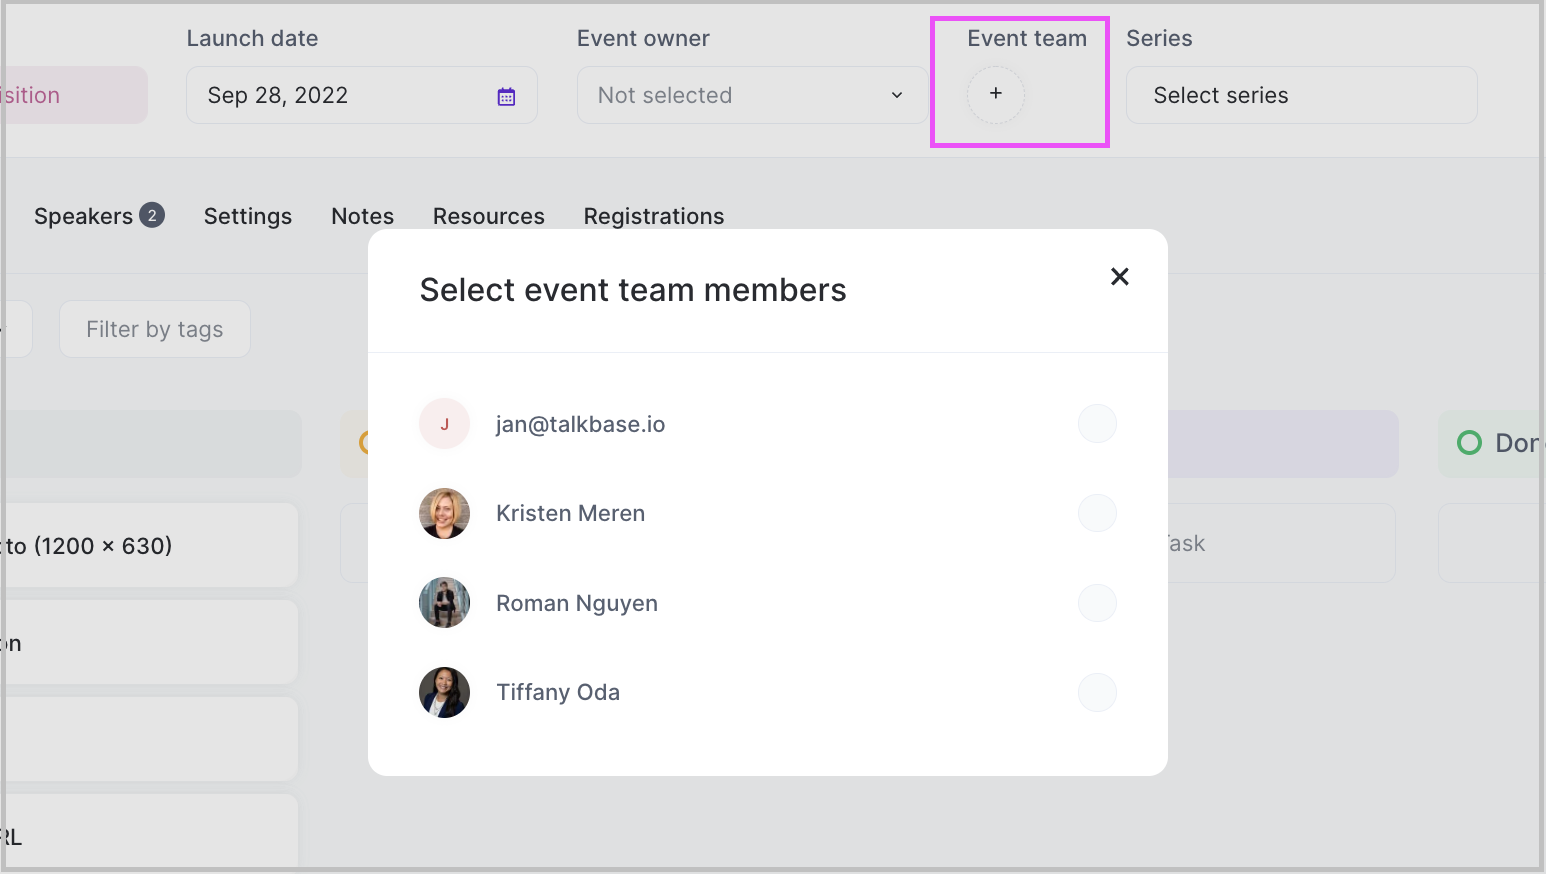
Event team
To select the team members who are involved with planning or coordinating the event:
- Click on "Event team" in the action bar.
- Select the event team members by checking the box by their name.
- You can close the window by pressing the "X" in the corner.
You can select people to be on the event team if they are members of your workspace. To add or edit members of your workspace, you can do so in Settings. Read more in the help article here.
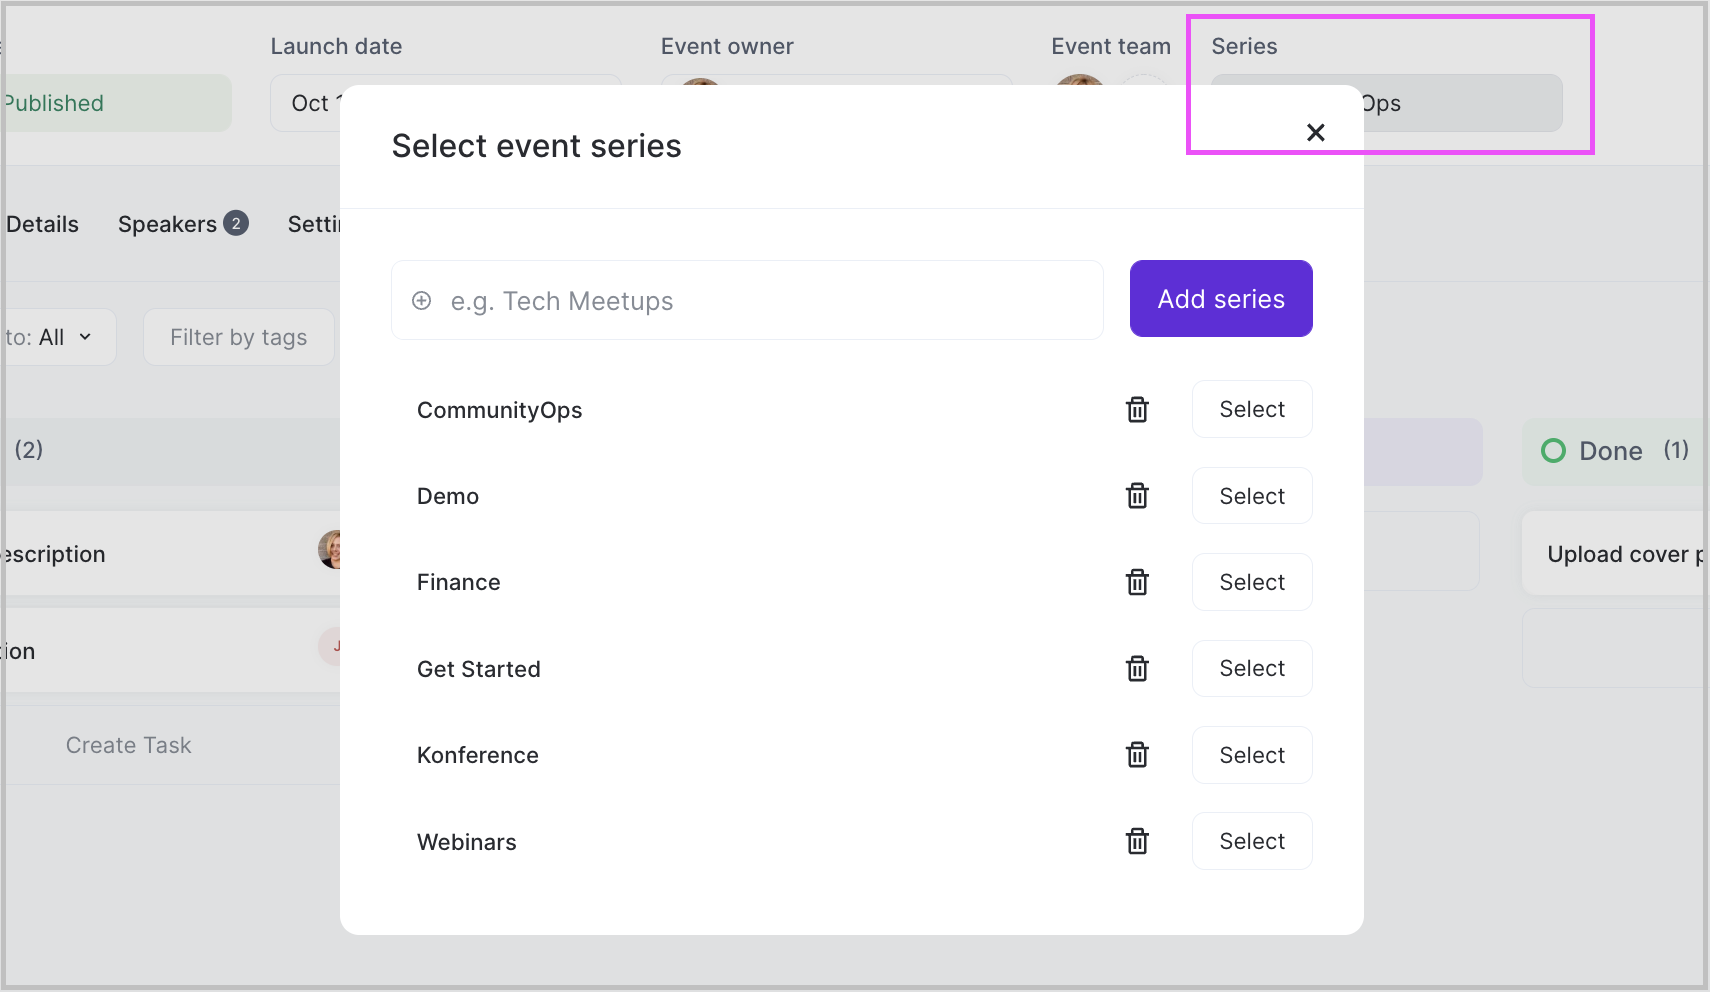
Event series
If you host recurring events or event series, you can classify your events and add them to a series. This allows for easier categorization and organization of your events.
To add an event to an event series:
- Click on "Series" in the action bar.
- Select the series that you would like to add the event to and click "Select".
- To add a new series, type the name of the series and click on the "Add series" button.
If you ever need to delete a series, click on the trash can icon by the event series name.
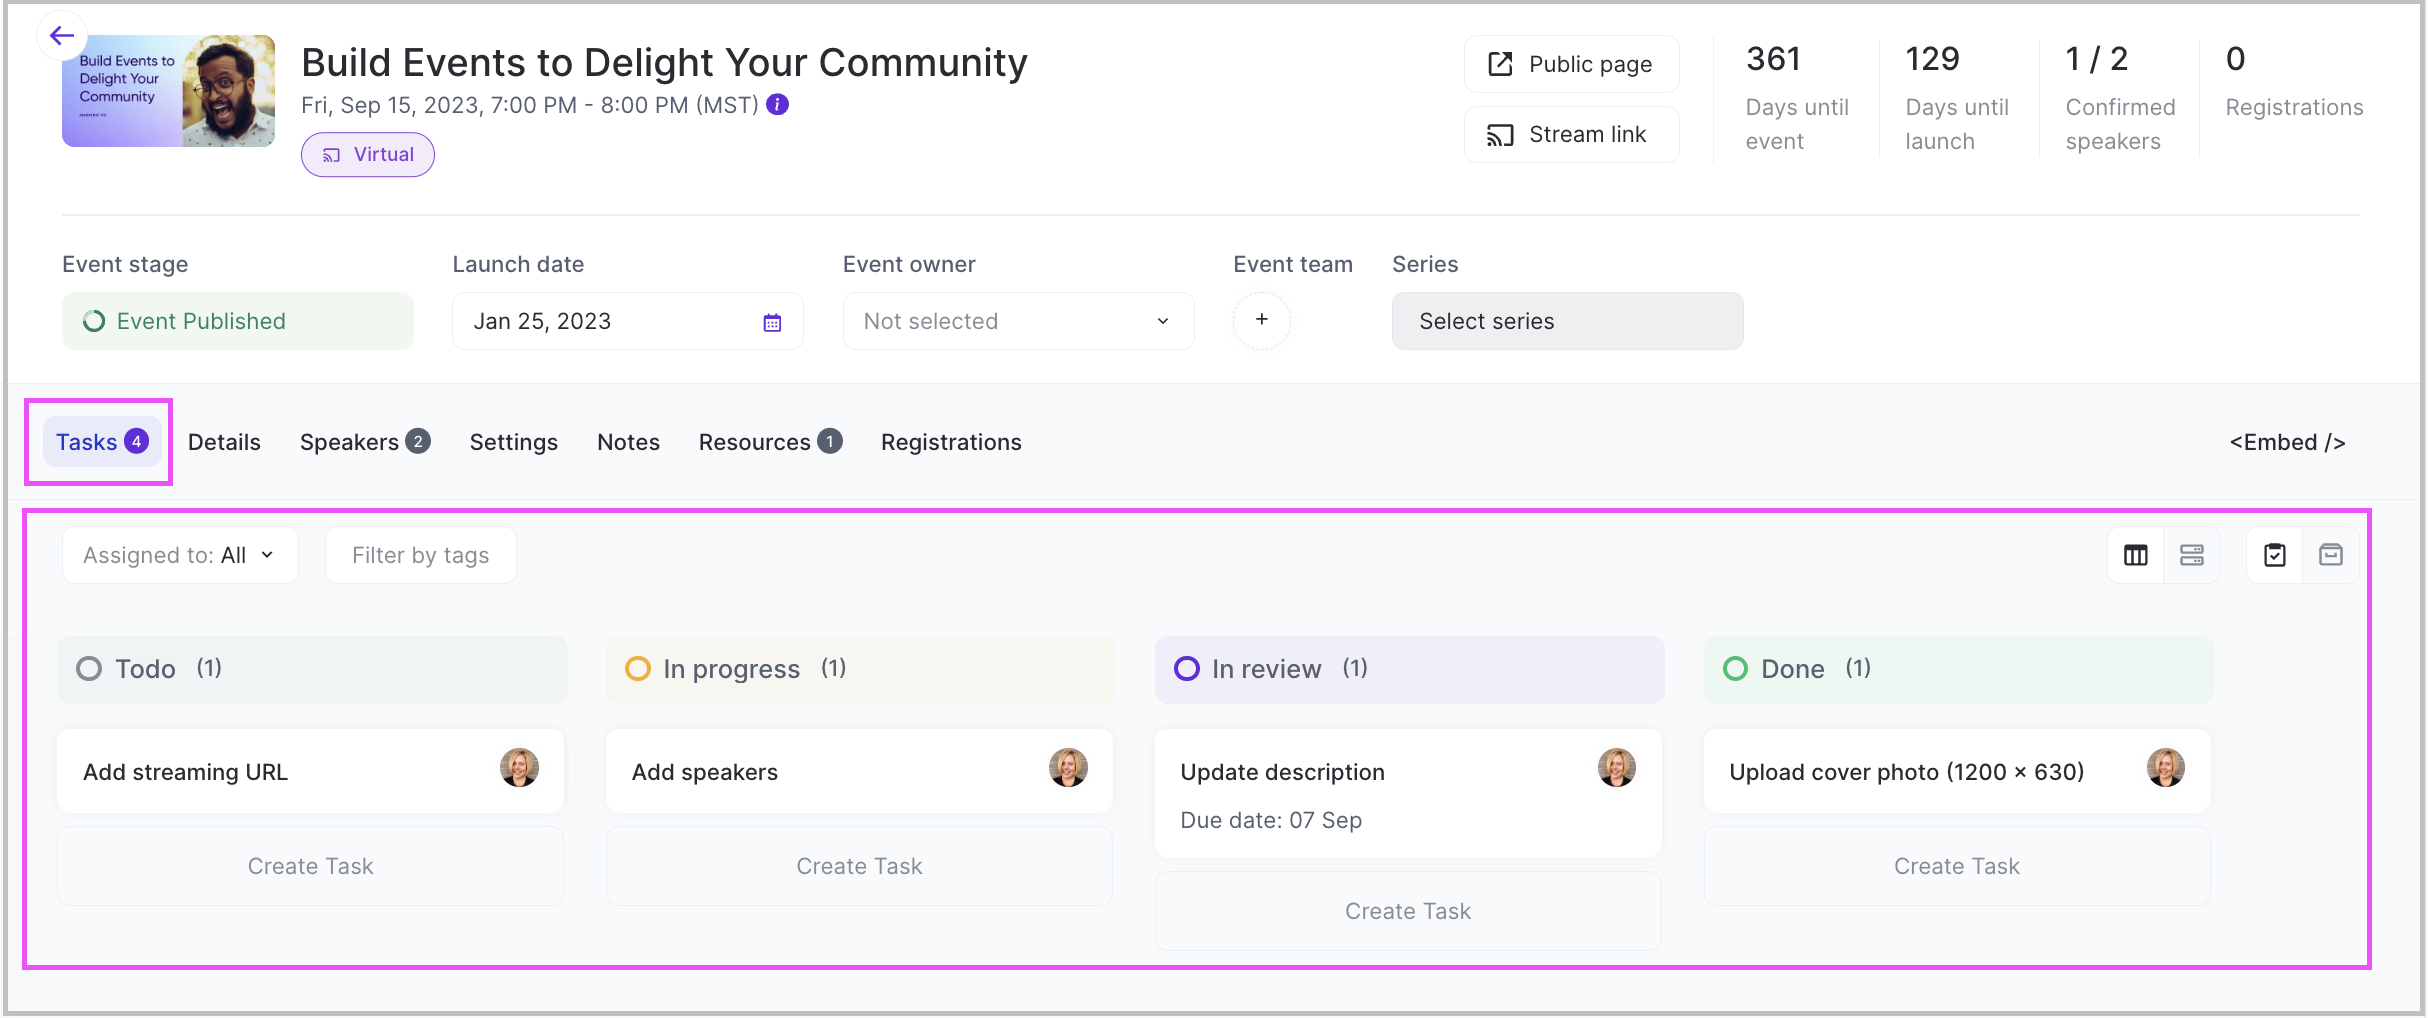
Event tasks
There are so many things to keep track of when planning events, and event tasks helps you and your team stay organized.
Event details
In the "Details" tab of the event editing page, you can modify the following items:
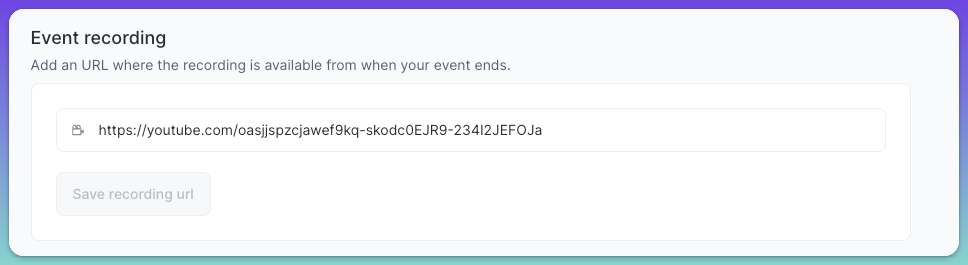
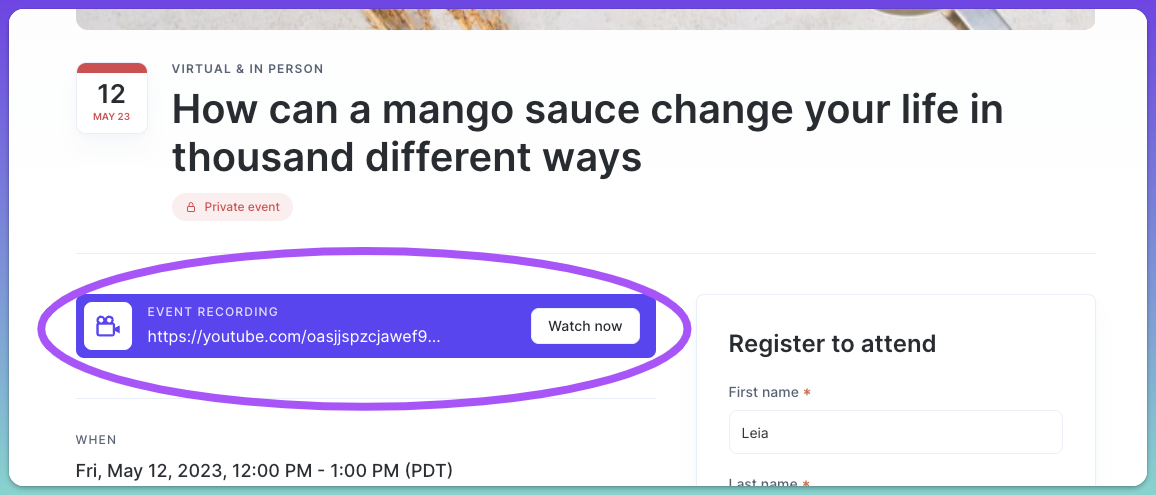
Event recording
After your event, you can add a URL in this field for your event recording. This will be displayed on the event's public page.
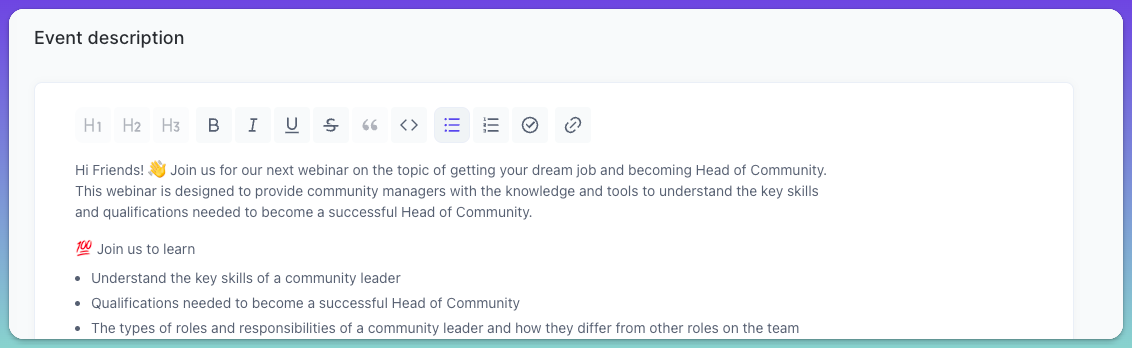
Event description
Add a description for your event - What can your attendees expect? What will be covered in the event? What food will be served? Add any relevant information you'd like to share. This information will be displayed on the event's public page.
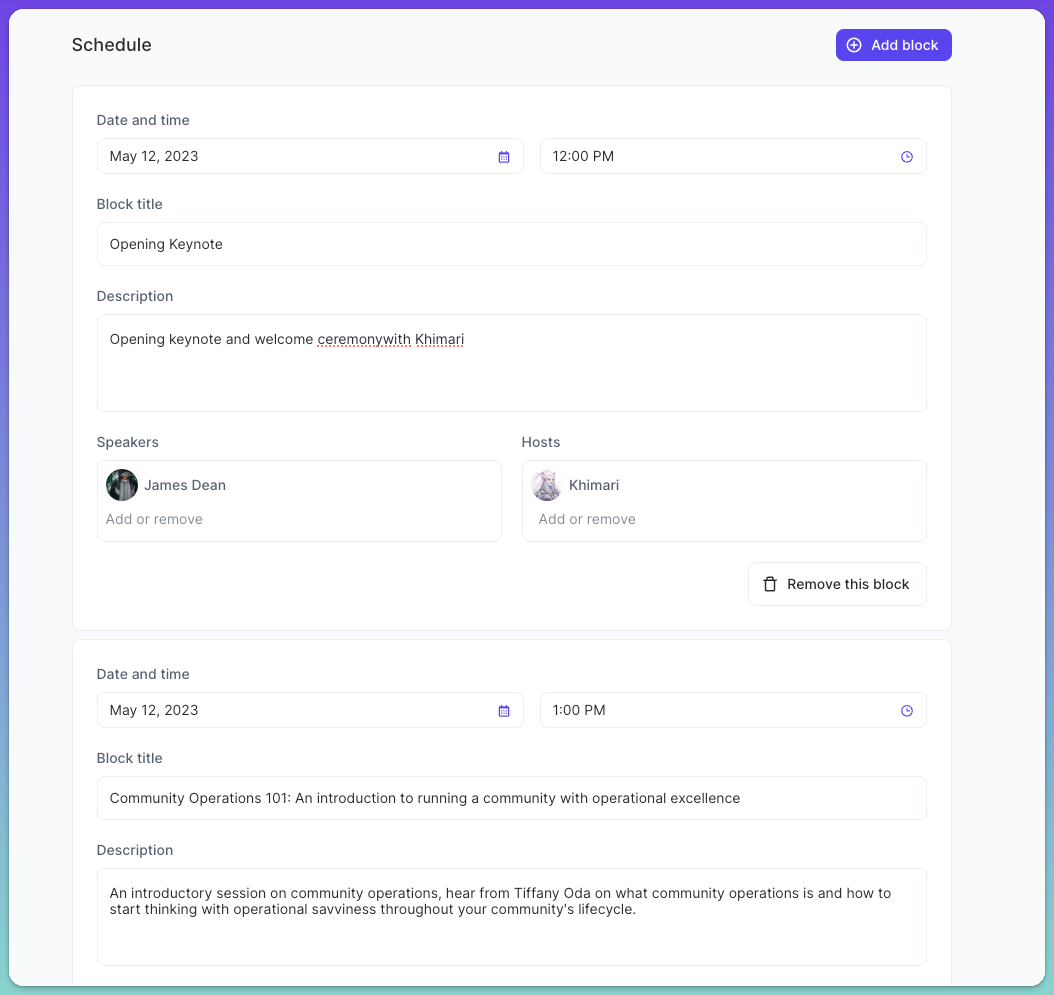
Schedule
Think of the schedule like the event's agenda. Here you can add various event blocks with designated times, a block title, description, and add the speakers and hosts for the block.
Information and disclaimers for attendees
If you have any additional information or disclaimers you need to let attendees know, you can add the information here. This information will be included on the event's public page.

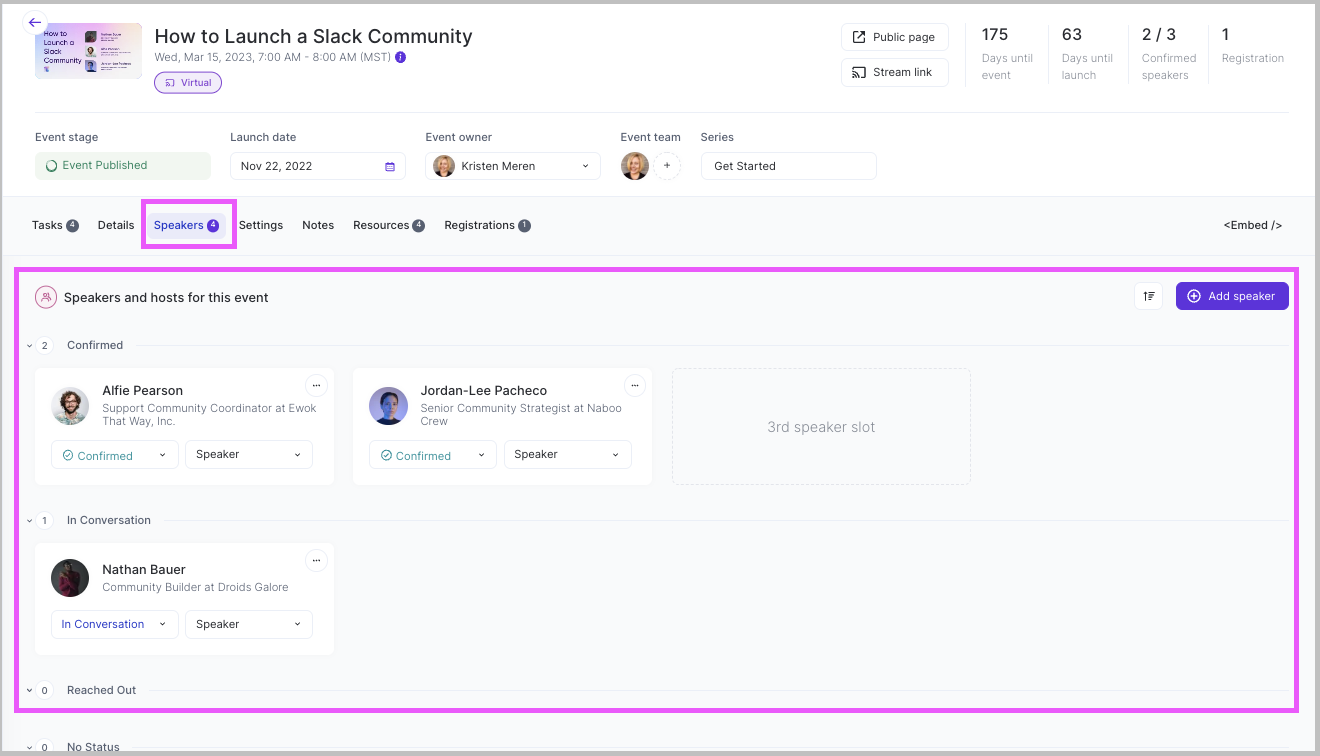
Event Speakers
Using the speakers feature, you can track the end-to-end process for finding, acquiring, and confirming speakers for your event.
- To add a new speaker to your pipeline, click on the "Add speaker" button.
- Select an existing contact from your workspace or add a new contact.
- There are multiple status for the speakers:
- Reached Out: you've reached out to them to see if they would be interested in speaking.
- In Conversation: you're currently speaking with the potential speaker about details.
- Confirmed: the speaker has confirmed their commitment for the event.
- Rejected: either you or the potential speaker is unable to speak.
- As you work through the process, you can change a speaker from one status to another by selecting the status dropdown in their tile and updating the status.
You can also track whether a contact is a speaker, a host, or both for the event. To change this, click on the "Speaker" dropdown in their tile and selecting the appropriate role.
To remove a contact from the event or view the contact's profile, click on the triple dot "···" symbol in the upper right corner of the tile and select the correct option.
Event Settings
Some of the event settings were configured at the time of creating the event, but if you ever need to update or add more details for the event, you can do so in the Settings. A few notes on certain event settings:
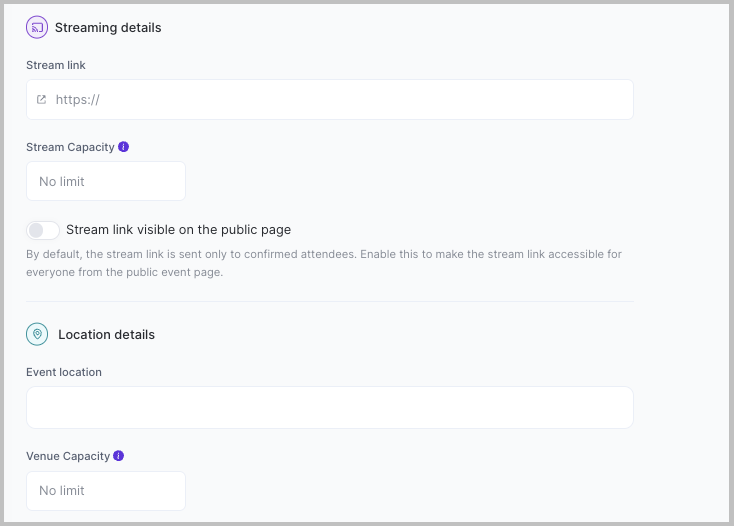
Event Type
There are three types of events you can set - virtual, in-person, or hybrid. For each of these event types, certain additional details will appear in the settings. Note that you cannot change the event type between "in-person" and "virtual" once the event has been published.
- Virtual: will have streaming details where you can provide a stream link (e.g. a Zoom URL), a stream capacity, and whether the stream link is visible on the public page.
- In-Person: will have location details, which will auto-load locations as you type, and venue capacity.
- Hybrid: will have both the streaming details to support the virtual attendees, as well as the location details to support the in-person attendees.
Registration and Reminders
By toggling on or off certain registration and reminder rules, you can manage what type of access and reminders your attendees will get.
-
Automatically confirm registration: if the event is open to all, you can select this toggle such that registered attendees receive confirmations with the event details immediately.
If you want to review the registrations before accepting them, you can toggle this off and you'll have to confirm them manually. If you go with this option, registrants will see a "Join waitlist" button rather than a "Register" button. They will also see the "Join waitlist" button if the capacity for the event has been reached.

- Reminder emails: there are two options for reminder emails you can enable for your event - a one day reminder, and a one hour reminder.
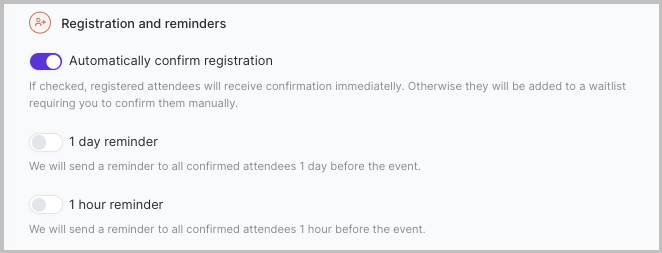
- Receive registration notifications: if you would like to get notified as people register for the event, have this toggle on.
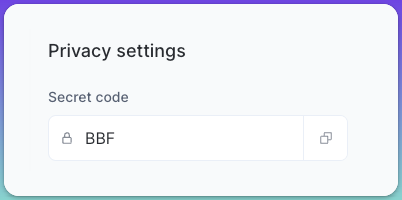
Privacy Settings
To host a private event, which will not be published on your community page, set a Secret code in the field box. Only people with the secret code can view the event details or register for the event.
By default, this field is empty and your event will be public and visible on your community page.
Delete an event
To delete an event:
- In the "Danger zone" section, under "Want to remove the event?" click on the "Delete event" button.
- You'll then be prompted to type "DELETE" and click on "Delete event" to confirm you would like to proceed.
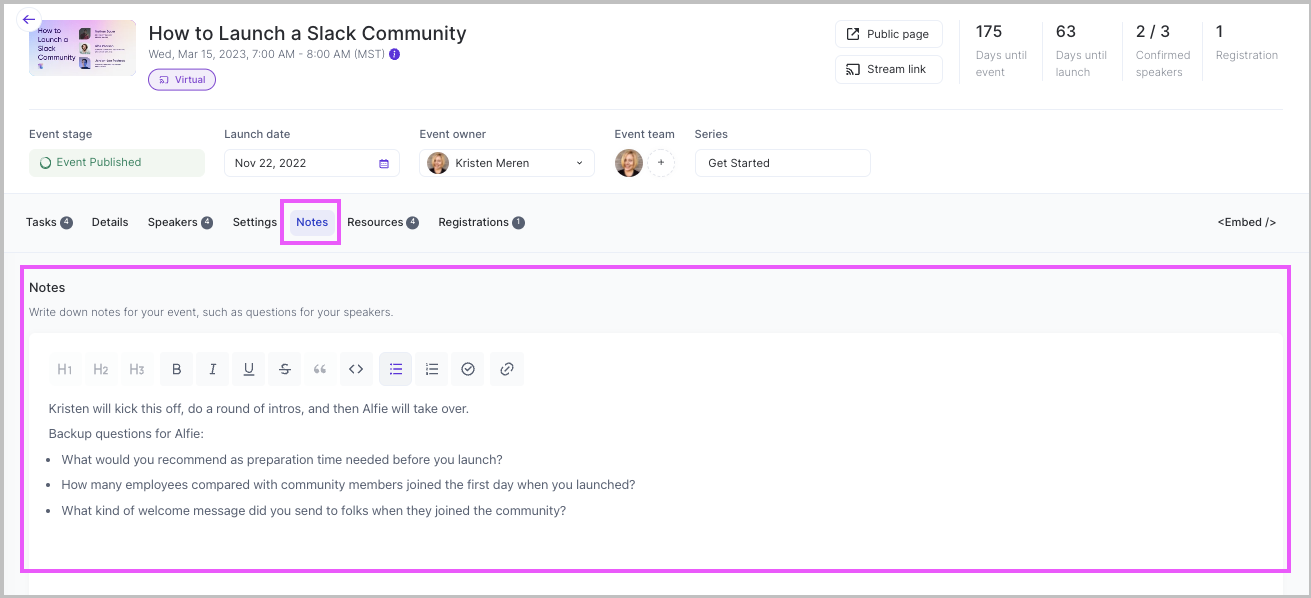
Event Notes
This is a free page where you can write down any notes for your event.
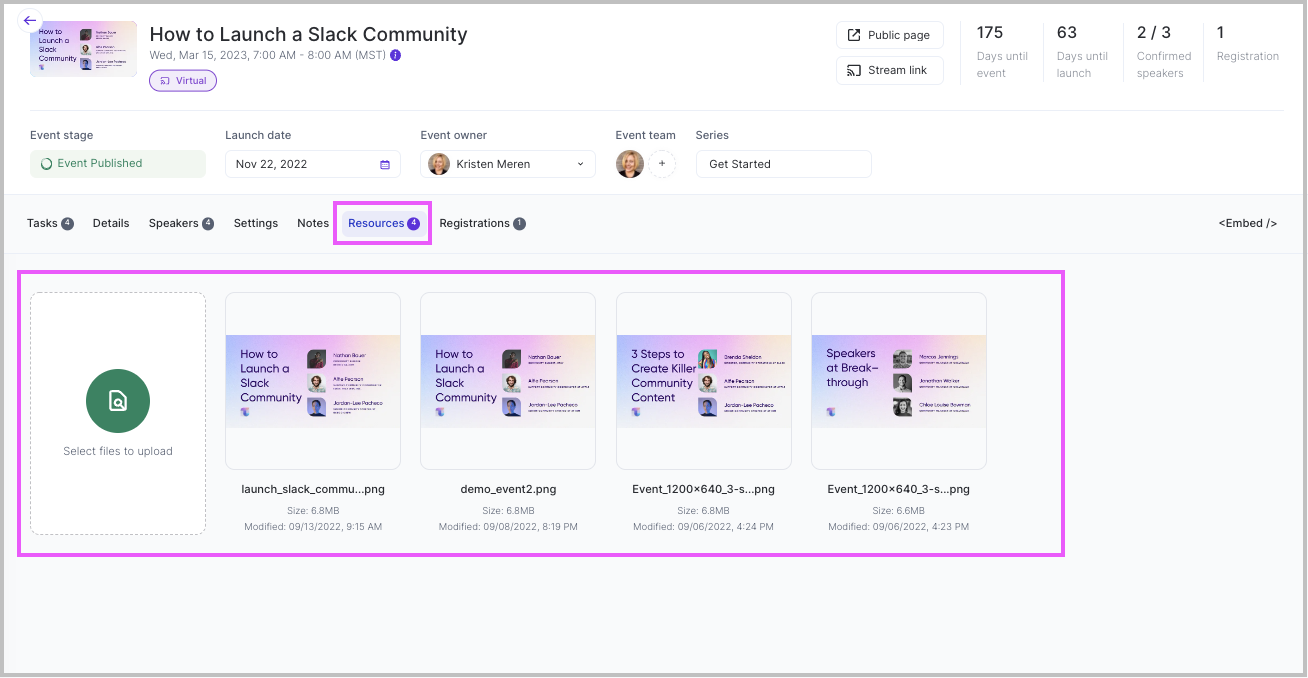
Event Resources
Event resource is where you can upload files that will be associated with the event, like the event image, speaker profile images, presentations, additional resources for attendees, etc.
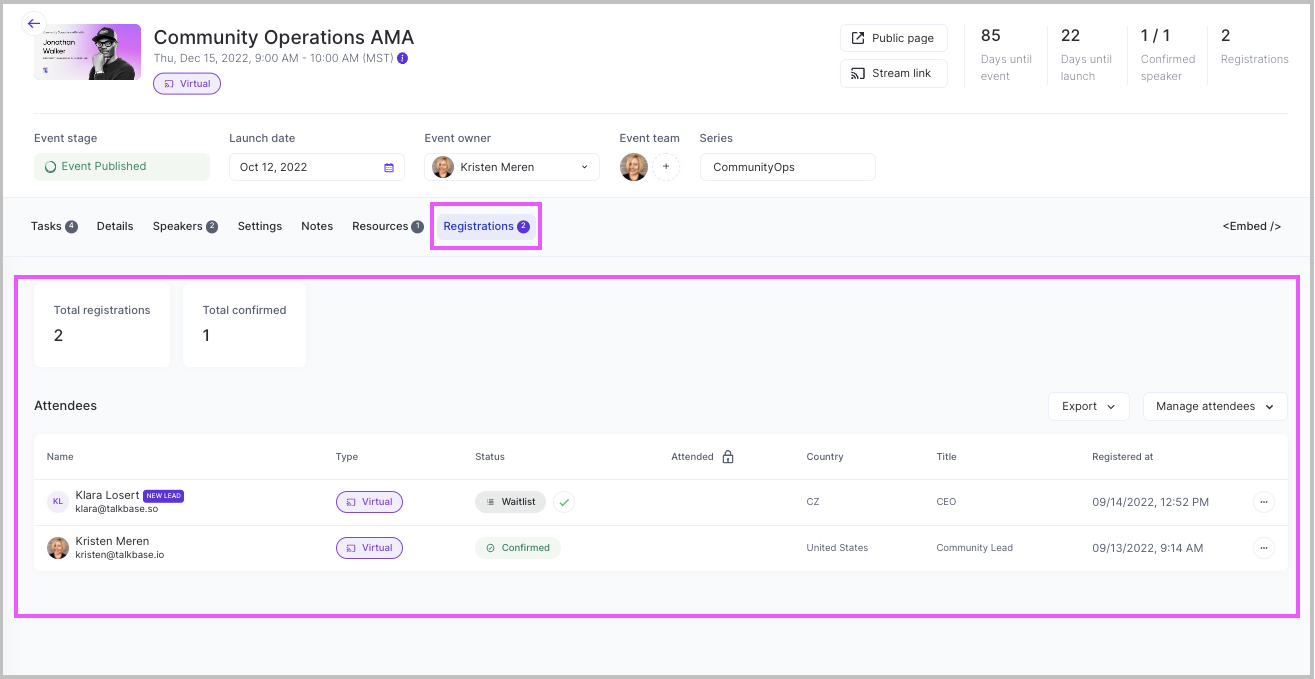
Event Registrations
Event Registrations is where you can view the people who have registered for your event.
If you selected the registration option to automatically confirm registration, all attendee statuses will be marked as "Confirmed". However, if you opted to review all registrations before confirming them, you'll see a status of "Waitlist". You can then confirm or reject them by clicking on the checkmark by their status, or by clicking the triple dot symbol "···" and selecting the option from there.
If a registrant has a change of schedule and can no longer attend, they can also update their status and you'll see a "Cancelled" status.
Registration Form
To customize the registration form for the event:
- In the "Registrations" tab, click "Registration form settings".
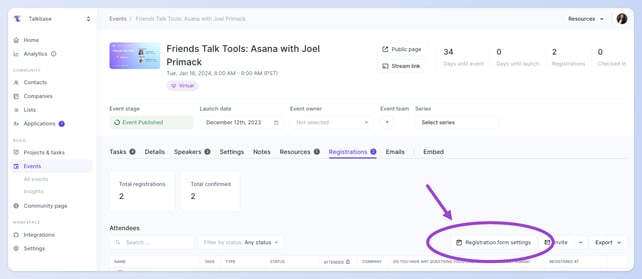
- You can then select custom fields that you'd like to add to the registration form. Default fields are included and are required automatically. For more information on custom and CRM form fields, visit this help article.
Frequently Asked Questions
What's the difference between an Event Title and a Block Title?
The Event Title is the name of the full event. You can update the Event Title under Settings > Event title field. The Block Title is specific to a session or segment of your event (for example, if your event has multiple sessions). An example is a keynote session, or lunch break, or a workshop. To update the Block Title, go to Details > Schedule.
Why can't I delete registrations?
Deleting registrations may lead to inconsistent or negative experiences for your community members. For example, if the event is in-person and an attendee's registration is deleted, they may still show up to the event with their QR code that they received upon registering for the event. However, the person checking them into the event will not see a record that they registered. As a best practice, we recommend rejecting their registration. This way there is still a record of the registration.
👋 If you need additional support, be sure to check out the Talkbase Friends Community where you can connect with fellow peers for help. Or, reach out to us at support@talkbase.io.
📍For future features and releases, keep an eye out on our Roadmap.