Review applications from potential community members for a gated community.
If you have a gated community, you can use the Community Applications feature to receive and review applications from prospective community members.
Settings & Form
As a first step, you will want to configure the settings to receive community applications.
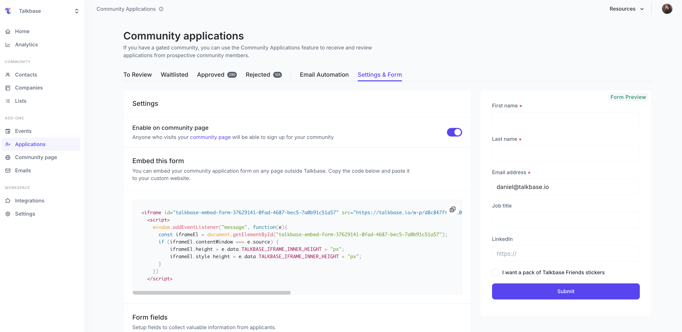
- From the navigation panel, click on "Applications" under the "Add-ons" section of the navigation panel.
- Click on the "Settings & Form" tab.
- If you would like the community application visible on your Community Page, you can toggle the switch for "Enable on community page" ON. (For more information on the Community Page, visit this help article.)
- Set up the application form by scrolling down to the Form fields section. By default, first name, last name, and email address are required fields. You can add new fields by clicking on "Select fields" under the Custom fields section. From here, you can opt to add new CRM Profile Attributes (which will appear on the contact's profile in the CRM) or Form Attributes (which will be saved to the form and are synced with any external CRM integrations, like HubSpot).
- To preview your form with any new form fields, refresh your page.
You can then embed your community application on any webpage by copying and pasting the code in the Embed this form section. Otherwise, it will be displayed on your Public Page if you've turned that option on.
Email Automation
You can also configure the emails sent from Talkbase for various application results.
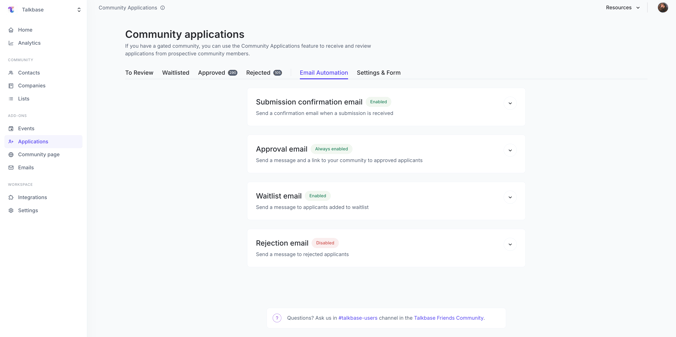
- Submission confirmation email - sent when someone submits their application
- Approval email - sent when someone on your team has approved a community application.
- Waitlist email - sent when a community applicant is added to a waitlist.
- Rejection email - sent when a community applicant is rejected.
You can customize each email:
- From address - who the sender of the email is (for example, your community manager or community team's email address).
- Email subject & body
- You can also use dynamic properties like filling in first or last name by using the hashtag (#) symbol.
☝️Tip: For your Approval email, be sure to include the link so your new member can join the community! For example, have you joined the Talkbase Friends Community yet?
You can also send a preview email by simply clicking "Send preview".
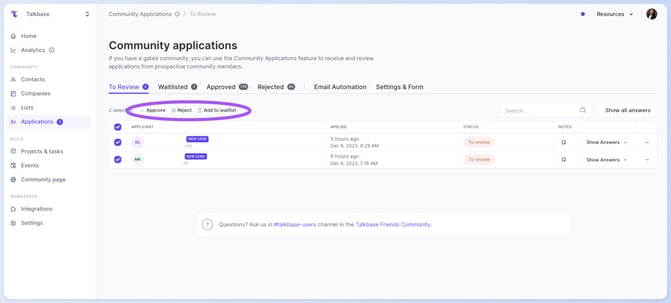
Reviewing and actioning on community applications
When someone submits the community application, you'll see a number by the "To Review" tab. Some tips and tricks to review community applications:
- You can click on their name to go to their member profile in the CRM if you want to view additional details on the individual.
- To view the answers they submitted in your Community Application form, click on the triangle to "Show Answers".
- Add any internal notes by clicking on the "Notes" icon. These notes will be for internal visibility only and can be used to document the reason you chose to accept, reject, or waitlist the applicant.
- To decision on an applicant, click on the triple dot icon "•••" and select the appropriate action.
- You'll be able to confirm the automated email as you confirm the decision. For example, if you'd like to add a personal note of some sort, you can do so before you send the email.
☝️ Tip: You can mass action on multiple applications simultaneously by checking the box at the top and selecting the appropriate action.
👋 If you need additional support, be sure to check out the Talkbase Friends Community where you can connect with fellow peers for help. Or, reach out to us at support@talkbase.io.
📍For future features and releases, keep an eye out on our Roadmap.